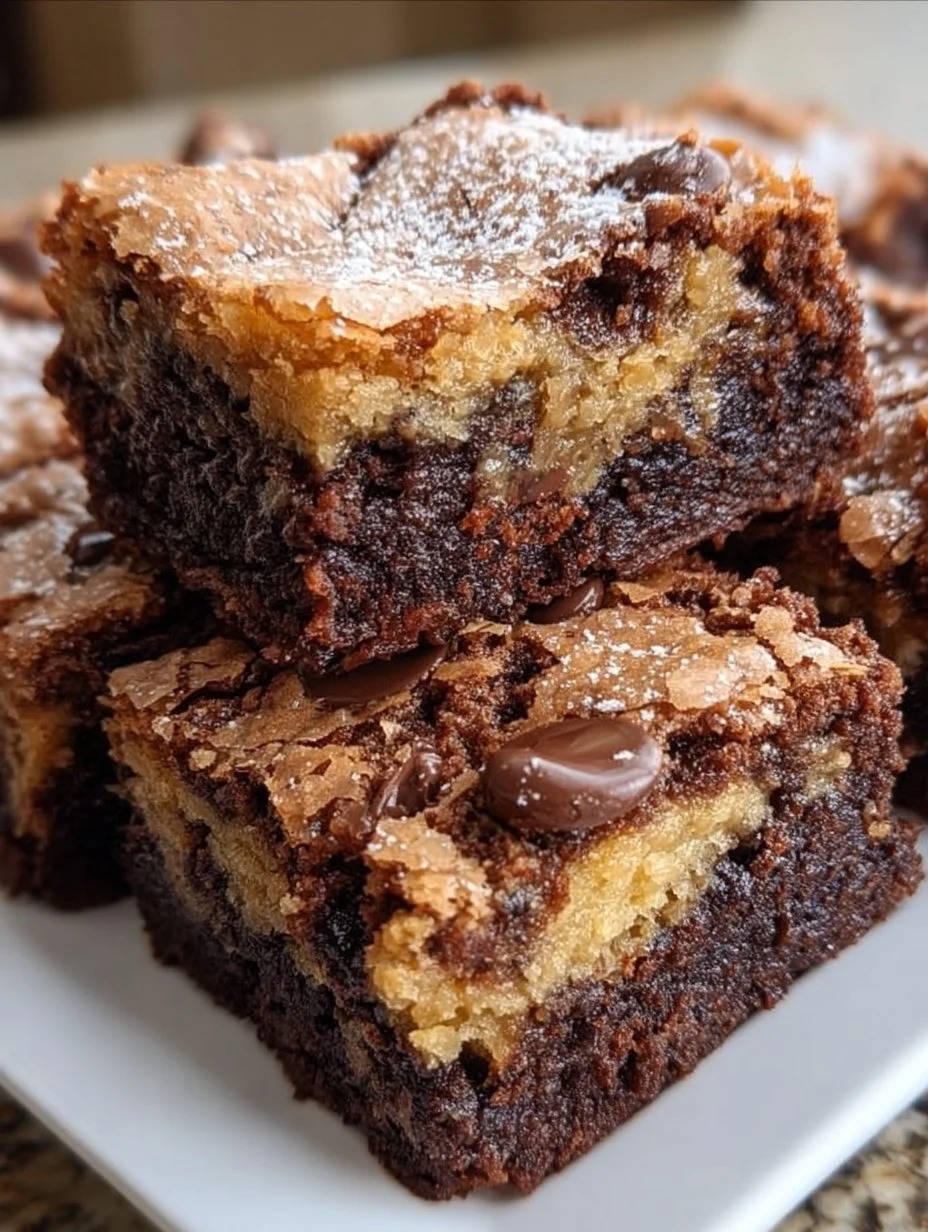
Indulging in a warm, gooey homemade brookie is like falling into a comforting embrace. As you take your first bite, your senses come alive with the delightful contrast of textures. The rich, fudgy brownie layer cradles soft, buttery cookie dough on top, creating a harmony that sings sweet melodies to your taste buds. Each mouthful melts effortlessly, with the chocolate chips adding little explosions of creamy goodness. The air fills with the sweet, nostalgic aroma of baking chocolate and caramelized sugar, drawing everyone into the kitchen, each person eagerly anticipating their slice of this indulgent treat.
You might think you’re biting into a simple dessert, but oh, it’s so much more! Homemade brookies present the best of both worlds—decadent brownies and soft, chewy cookies—dancing together on your palate. The contrast between the brownie’s dense fudge and the cookie’s lightness creates a tantalizing experience that keeps you reaching for just one more slice. When shared among friends or family, these delightful bars generate laughter and joyful connections, making every occasion feel a little more special.
Why You’ll Love This Homemade Brookies
Homemade brookies are not just a treat; they are a celebration! You’ll adore how seamlessly the flavors of chocolate, vanilla, and caramel meld together. Perfect for gatherings, family movie nights, or simply indulging yourself after a long day, these treats leave everyone craving more. Their whimsical fun makes them impossible to resist, and the mere thought of warm, chocolatey goodness ensures adults and kids alike will clamor for a taste.
What sets brookies apart is their unique ability to bridge the gap between two beloved desserts. When you pull a pan of freshly baked brookies out of the oven, the sight alone is enough to make hearts race. This delightful combination not only satisfies your sweet tooth but also evokes fond memories of childhood—think of how you felt as a child discovering dessert for the first time. Homemade brookies offer comfort, nostalgia, and an experience you’ll want to recreate time and again.
Preparation Phase & Tools to Use
Before diving into creating your own homemade brookies, let’s talk about the essential tools that will make your baking adventure easier and more enjoyable.
-
9×13 inch baking pan: This sturdy pan is ideal for baking your brookies as it provides enough space for the two layers without crowding. A glass or metal pan works equally well; just remember to grease it thoroughly to avoid sticking.
-
Mixing bowls: You’ll need at least two large mixing bowls—one for the brownie batter and another for the cookie dough. Having sturdy, easy-to-hold bowls will help you blend your ingredients smoothly.
-
Measuring cups and spoons: Precision is key in baking! Use these for accurate measurements of your ingredients. Each time you measure, remember that baking is a science, and the right amounts yield delicious results.
-
Rubber spatula: This invaluable tool helps you scrape every bit of batter from the bowl. Plus, it is perfect for folding in the chocolate chips, ensuring every bite is heavenly.
-
Whisk or electric mixer: While you can mix by hand, having an electric mixer saves time and makes for fluffier dough. However, using a whisk and some elbow grease can also yield fantastic results!
-
Toothpick or cake tester: This will be your trusty tool to check for doneness, ensuring your brookies have that perfect fudgy texture without being undercooked.
Prepare your workspace by gathering all the ingredients and tools you need. A clean, organized area sets the mood for a blissful baking experience!
Ingredients for Homemade Brookies
Gathering the right ingredients brings the excitement of baking to life. Here’s what you need for your homemade brookies:
- 1 cup unsalted butter, melted: Adds richness and moisture to both layers.
- 1 cup brown sugar: This provides a deep, caramel-like sweetness that enhances the brownie layer.
- 1/2 cup granulated sugar: Balances the flavors perfectly by adding a touch of sweetness without overwhelming the mix.
- 2 large eggs: Essential for binding the ingredients together and creating a fluffy texture.
- 2 teaspoons vanilla extract: Infuses the batter with an irresistible aroma and rich flavor.
- 1 cup all-purpose flour: The backbone of both brownie and cookie layers; creates the structure.
- 1/2 cup cocoa powder: A key player in the brownie layer, giving it that deep chocolatey color and flavor.
- 1/2 teaspoon baking soda: A leavening agent to help your brookies rise beautifully.
- 1/2 teaspoon salt: Enhances the sweetness while balancing flavors.
- 1 cup chocolate chips: Essential for a burst of melty chocolate goodness in every bite.
Feel free to personalize the ingredients! If you’re looking for a lighter option, try using coconut oil instead of butter, or swap out half of the all-purpose flour with whole wheat flour for a wholesome twist. Chocolate chips can easily be replaced with white chocolate or a blend of nuts for added crunch!
How to Make Homemade Brookies
Baking homemade brookies dissolves any worries with their straightforward process. Follow these step-by-step instructions for an incredibly satisfying outcome:
- Preheat your oven to 350°F (175°C) and grease a 9×13 inch baking pan to ensure a flawless release after baking.
- In a large bowl, mix together the melted butter, brown sugar, and granulated sugar until smooth and creamy—your kitchen will soon fill with a delightful aroma!
- Add the eggs and vanilla extract, mixing well until fully incorporated. The mixture should shimmer with sweetness as it comes together.
- In another bowl, combine the flour, cocoa powder, baking soda, and salt. Whisk until evenly blended, ensuring no dry lumps remain.
- Gradually add the dry ingredients to the wet mixture, stirring gently until just combined. Fold in the chocolate chips, leaving you with a rich, irresistible brownie batter.
- Spread the brownie batter evenly in the prepared baking pan, creating a luscious base.
- In a separate bowl, cream together the butter, brown sugar, and granulated sugar for the cookie layer. Beat in the eggs and vanilla until fluffy; the texture should be light and airy.
- In another bowl, combine the flour, baking soda, and salt. Gradually add to the creamed mixture, blending well before delicately folding in the chocolate chips.
- Drop spoonfuls of the cookie dough over the brownie layer—feel free to get creative with the placement for an artful appearance!
- Bake in the preheated oven for 25-30 minutes or until the top is golden-brown and a toothpick inserted in the center comes out clean. The smell wafting through your kitchen will have everyone clamoring for a taste!
- Allow the brookies to cool, then cut into bars and enjoy the heavenly combination of textures.
Chef’s Notes & Helpful Tips
Take your brookie game to the next level with these tips and tricks:
-
Make-ahead tips: Prepare the brownie and cookie dough in advance and refrigerate them overnight. Then, simply layer and bake the next day for a fresher taste.
-
Cooking alternatives: If you want to use an air fryer, adjust your cooking time to about 15-20 minutes for smaller batches. Ensure proper airflow by loading the cooking basket evenly.
-
Customization ideas: Mix in different add-ins, such as crushed Oreos or caramel swirls, for a unique twist. Swap chocolate chips for your favorite candy bars for unexpected bursts of flavor.
Common Mistakes to Avoid
Baking can be tricky, but being aware of common pitfalls can save you time and effort:
-
Overmixing the batter: This can result in tough brookies. Mix gently until just combined for a tender texture.
-
Not greasing the pan adequately: Prevent potential sticking by ensuring the surface is well-greased or lined with parchment paper.
-
Overbaking: They should still be slightly soft in the center when you remove them from the oven. Keep an eye on their color—golden-brown edges indicate perfect doneness!
What to Serve With Homemade Brookies
Serve your delectable brookies with delightful accompaniments that elevate the experience even further:
- Vanilla ice cream: A scoop of creamy vanilla atop a warm brookie creates a divine hot-and-cold combination.
- Fresh berries: The tartness of raspberries or strawberries offsets the richness of the brookies beautifully.
- Whipped cream: A dollop adds a light and airy note, enhancing the indulgence.
- Chocolate drizzle: An extra touch of melted chocolate elevates the presentation and flavor.
- Caramel sauce: Drizzle warm caramel for a sweet twist that dazzles the taste buds.
- Milk: Nothing pairs quite like a classic glass of cold milk, especially with the chocolate richness.
- Coffee or espresso: For an adult twist, enjoy with a strong cup of coffee to balance the sweetness.
Storage & Reheating Instructions
Store your homemade brookies in an airtight container at room temperature for up to 3 days. If you wish to keep them longer, they freeze beautifully! Wrap individual bars in plastic wrap, then place them in a freezer-safe container. They can stay good in the freezer for up to three months.
To reheat, simply place a cooled brookie in the microwave for about 10-15 seconds or in a preheated oven at 350°F (175°C) for 5 minutes. These methods will bring back that warm, gooey texture, perfect for an after-school snack or a late-night treat!
Estimated Nutrition Information
Approximate nutrition values per serving (1 bar):
- Calories: 320
- Total Fat: 16g
- Saturated Fat: 10g
- Cholesterol: 50mg
- Sodium: 150mg
- Total Carbohydrates: 45g
- Dietary Fiber: 2g
- Sugars: 25g
- Protein: 3g
(Note: Nutrition values may vary based on ingredients used.)
FAQs
1. Can I use gluten-free flour?
Absolutely! You can substitute all-purpose flour with a 1:1 gluten-free baking blend for a gluten-free version of this recipe.
2. How can I tell when my brookies are done baking?
Look for a slight jiggle in the center, but golden-brown edges are a good sign. A toothpick inserted should come out clean or with a few moist crumbs.
3. What can I do with leftover brookies?
Leftover brookies can be reheated or used in a variety of desserts—try layering them in a sundae or blending them into a milkshake for a delicious twist!
4. Can I make these vegan?
Yes! Substitute eggs with flaxseed meal or applesauce and use a vegan butter alternative, as well as vegan chocolate chips, for a plant-based version.
5. How long do these keep fresh?
Homemade brookies last about 3 days at room temperature, and they can be frozen for about three months if well-wrapped.
Conclusion
Baking homemade brookies is not just about satisfying cravings; it’s an experience rich with warmth and nostalgia. The enticing aroma, inviting flavors, and delightful textures invite everyone to partake in the joy of creation. As the delightful fusion of brownies and cookies comes alive in your kitchen, let yourself enjoy the process and share it with loved ones. Now it’s time to crack open that ingredient cupboard, preheat the oven, and bring these heavenly sweets to life. Trust me, you won’t regret it!
Print
Homemade Brookies
- Prep Time: 15 minutes
- Cook Time: 30 minutes
- Total Time: 45 minutes
- Yield: 12 servings 1x
- Category: Dessert
- Method: Baking
- Cuisine: American
- Diet: Vegetarian
Description
A delightful combination of brownies and cookies, these homemade brookies are rich, fudgy, and sure to satisfy any sweet tooth.
Ingredients
- 1 cup unsalted butter, melted
- 1 cup brown sugar
- 1/2 cup granulated sugar
- 2 large eggs
- 2 teaspoons vanilla extract
- 1 cup all-purpose flour
- 1/2 cup cocoa powder
- 1/2 teaspoon baking soda
- 1/2 teaspoon salt
- 1 cup chocolate chips
Instructions
- Preheat your oven to 350°F (175°C) and grease a 9×13 inch baking pan.
- Mix together the melted butter, brown sugar, and granulated sugar until smooth.
- Add the eggs and vanilla extract, mixing well until fully combined.
- Combine the flour, cocoa powder, baking soda, and salt in another bowl.
- Gradually add the dry ingredients to the wet mixture, stirring gently until just combined.
- Fold in the chocolate chips.
- Spread the brownie batter evenly in the prepared baking pan.
- Cream together the butter, brown sugar, and granulated sugar for the cookie layer in a separate bowl.
- Beat in the eggs and vanilla until fluffy.
- Combine the flour, baking soda, and salt; gradually add to the creamed mixture.
- Drop spoonfuls of cookie dough over the brownie layer.
- Bake for 25-30 minutes or until golden-brown and a toothpick comes out clean.
- Allow to cool, then cut into bars.
Notes
For a lighter option, consider using coconut oil instead of butter, or swap out half of the all-purpose flour with whole wheat flour.
Nutrition
- Serving Size: 1 bar
- Calories: 320
- Sugar: 25g
- Sodium: 150mg
- Fat: 16g
- Saturated Fat: 10g
- Unsaturated Fat: 6g
- Trans Fat: 0g
- Carbohydrates: 45g
- Fiber: 2g
- Protein: 3g
- Cholesterol: 50mg